Black Silk Dress
- Idil

- Apr 16, 2022
- 3 min read
Updated: May 22, 2022
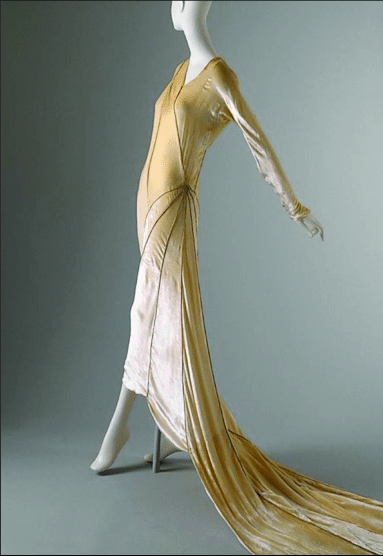
I have around 50 different deadstock/vintage fabrics waiting in the stock to become new creations. Regardless of that, I cannot help with the urge to search for the next best fabric around the corner. Occasionally I go out and roam my favourite fabric shops without a specific project or plan in mind. During one of those random visits to Max Bloch, I found this vintage black silk fabric. Total love at first sight. It had the best texture, soft to touch, perfect shine when it drapes with movement. I knew that it was time to do my first bias cut dress with hand sewing technique. Although the dress in the end turned out to be a simple and effortless looking dress, this was by far the most time consuming project.
Keep reading for more details :)
or
Jump to different sections:
Inspiration
I got my inspiration for this dress from the master of all, Madeline Vionnet. She was a revolutionary designer, who invented the bias cut technique. Although she was not internationally known, she made a huge impact on fashion evolution which paved the way to a modern, comfortable and feminine look that is still valid today.


Pattern making
The pattern making process for the bias cut is not very different than a normal pattern. I started from a basic foundation block and I made modifications like an empire cut pattern. As the bias cut will allow the dress to sit more loosely on the body, I reduced almost all ease on the bust, waist and back pieces to have a tighter fit. I left the lower back of the pattern neutral to see the drape on the mannequin first and decided to adapt the pattern later to achieve the drape I want on the back. I decided on an A line skirt with slight flare. Once all of the pattern pieces were done, I did a trial with a fabric similar to the original fabric to confirm the patterns and made necessary modifications to produce the final patterns.
Sewing
As silk is a delicate fabric, it is important to follow the correct steps to ensure you cut the pattern pieces correctly. Before I start to cut the silk, I lay a large piece of paper and fix the fabric on the paper with pins to make sure it stays in place during the cutting process. This is the most important step, and you need to make sure the grainline of the fabric lays correctly, parallel to the straight edge of the paper. Take time to sweep the little folds of fabric in place to make sure the grainline lays in the correct direction. After the fabric is fixed on one corner, you need to fold it in half from the bias like demonstrated in the picture below. Once the fabric is positioned well you can continue to cut the pattern pieces on the bias of the fabric.


Moving on to the sewing part, this project took the longest time to complete due to intense hand sewing I had to do. I started by laying the pattern pieces of the bodice on the mannequin and I hand sew them together to form the bodice. Once the double layer bodice was complete, I moved on to the bottom part. First, I basted the skirt pieces together. Then I sew the bodice and skirt part together. The dress has an open back with lower draped piece, therefore I only needed a seam line to connect the bodice to skirt on the front part of the dress. After several fittings I moved on to the final seams of the skirt. At this point the fabric was hanging on the mannequin for already several days, therefore I was confident the fabric had stretched enough to finalise the skirt side seams and the hem line.
After I finish everything, I decided I was missing a slit. I improvised a method to determine the slit position and achieve a straight cut by hanging a chain from the top point of the slit. I followed the chain which lays straight with gravity, and I cut the slit. After I hand sew the edges of the slit, I finished the inner seams by hand to have a clean look.


Final look


I hope you enjoy the project!
You can send me a message for any questions and subscribe to my blog to be informed about all the future content!
Cheers,
Idil


Comments